

A chaotic pantry isn’t just an eyesore, it’s money down the drain. When cans hide behind boxes and expired spices crowd the shelves, homeowners end up buying duplicates or tossing food they forgot they owned. An organized pantry saves time, reduces waste, and makes meal prep smoother. The difference between a functional pantry and a cluttered mess comes down to intentional systems, not expensive container sets. This guide breaks down 15 practical strategies to transform any pantry, walk-in, reach-in, or cabinet, into a space that actually works for daily life.
Table of Contents
ToggleKey Takeaways
- Organize pantry ideas start with a complete cleanout: remove all items, check expiration dates, donate unused goods, and clean shelves to eliminate pests and crumbs.
- Tailor your organization system to your pantry type—walk-in, reach-in, or cabinet—using adjustable shelving, pull-out drawers, or stackable risers to maximize every inch of available space.
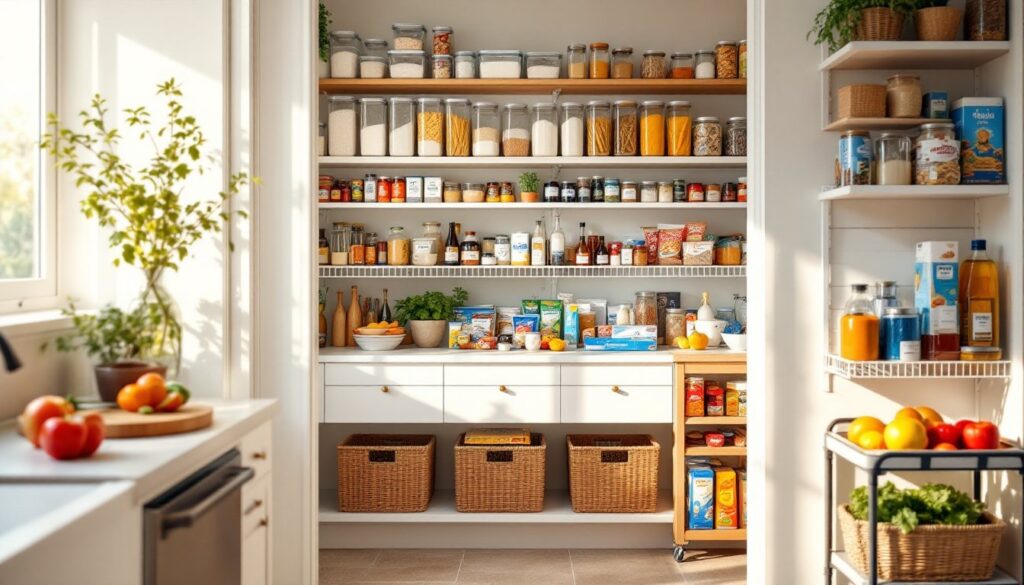
- Decant dry goods like flour, sugar, and rice into clear airtight containers with labels to reduce waste, prevent food spoilage, and make inventory levels instantly visible.
- Zone your pantry by food category (baking, breakfast, snacks, canned goods, and bulk items) to create a functional system where every family member knows where to find what they need.
- Maximize vertical space using adjustable shelving, shelf risers, hanging baskets, and wall-mounted systems to effectively double capacity and keep frequently used items at comfortable heights.
Start With a Complete Pantry Cleanout
Before buying a single container or shelf, everything needs to come out. Pull all items from the pantry and set them on a counter or table where they can be sorted. This step exposes what’s actually taking up space, and what’s been lurking in the back since 2022.
Check expiration dates ruthlessly. Toss anything past its date, especially flour, baking powder, and spices that lose potency over time. Donate unopened, non-expired items that won’t realistically get used. If it’s been sitting there for a year untouched, it’s not coming back into rotation.
While the pantry is empty, vacuum or sweep the shelves and wipe them down with a damp cloth. Crumbs and spills attract pests, and this is the easiest time to address them. Inspect for signs of pantry moths or other intruders, small webbing or larvae mean it’s time for a deeper clean and possibly some pest control measures.
Group similar items together during the cleanout: baking supplies, canned goods, snacks, breakfast items, and condiments. This rough sorting reveals how much space each category needs and informs the layout when everything goes back in. It’s also the moment to realize if six half-empty bags of rice need consolidating.
Smart Storage Solutions for Different Pantry Types
Not all pantries are built the same, and the organization system needs to match the footprint. A walk-in pantry has different challenges than a narrow cabinet next to the fridge. The key is working with the existing structure instead of fighting it.
Walk-In Pantry Organization
Walk-in pantries offer floor-to-ceiling storage but can turn into black holes if zones aren’t clearly defined. Install adjustable shelving on at least one wall to accommodate tall items like cereal boxes or bulk paper towels. Standard shelving depths range from 12 to 16 inches, deeper shelves work for large items, but anything past 16 inches makes the back row inaccessible without pulling everything forward.
Use the door. Over-the-door racks or narrow shelving systems add storage for spices, foil, and plastic wrap without taking up prime shelf real estate. Mount them securely with heavy-duty hinges if adding weight to the door: flimsy racks sag and create more mess.
Consider a rolling cart or small utility shelving unit for the center of the space if there’s room to walk around it. This works well for frequently rotated items like produce bins, snack baskets, or small appliances that don’t fit in the kitchen. Keep the floor clear enough to move comfortably, a cramped walk-in defeats the purpose.
Reach-In and Cabinet Pantry Systems
Reach-in pantries and cabinet systems demand tighter organization because every inch counts. Pull-out drawers or sliding shelves make the back of deep cabinets accessible without playing Jenga with canned goods. These can be retrofitted into existing cabinetry, though it requires measuring the interior dimensions carefully and ensuring the slides are rated for the weight of loaded shelves.
Stackable shelving risers double the usable space on fixed shelves by creating tiers for cans, jars, or boxed goods. Wire or plastic risers both work: wire allows for better visibility, but plastic versions often include non-slip surfaces. Measure the shelf height before buying, risers that are too tall waste vertical space or force items to lay sideways.
Lazy Susans work wonders in corner cabinets or deep shelves where items tend to get shoved to the back. Group condiments, oils, or jars on a turntable for quick access. Stick to models with raised edges to keep bottles from sliding off during rotation. For narrow cabinets, consider tiered organizers that step upward like stadium seating, each row stays visible.
Use Clear Containers and Labels for Maximum Efficiency
Clear, airtight containers aren’t just Instagram-worthy, they’re functional. Decanting dry goods like flour, sugar, rice, and pasta into uniform containers makes it immediately obvious when supplies run low and keeps food fresher by sealing out moisture and pests.
Choose containers with wide openings for easy scooping and refilling. Square or rectangular shapes use shelf space more efficiently than round jars, which leave gaps. Standard sizes include 4-quart containers for flour or sugar and smaller 1- to 2-quart options for specialty grains or baking mixes. Make sure lids seal tightly, a loose lid defeats the purpose.
Labels eliminate guessing games, especially when multiple family members use the pantry. Use a label maker for a clean look, or chalkboard labels if contents change frequently. Include the expiration date on the label when transferring items from their original packaging. Some foods, like baking staples stored in clear bins, benefit from having prep instructions noted on the container as well.
Not everything needs a fancy container. Canned goods and individually wrapped snacks are fine as-is. Reserve containers for bulk items, opened bags, and anything prone to going stale or attracting pests. Airtight storage is critical for flour, sugar, oats, nuts, and crackers. Pasta and rice keep longer when sealed, but they’re less urgent if the original packaging is intact.
Zone Your Pantry by Food Category
Assigning specific zones for different food types turns a pantry into a functional system instead of a free-for-all. Group similar items together so anyone in the household can find what they need without a scavenger hunt.
Designate a baking zone for flour, sugar, baking powder, vanilla extract, chocolate chips, and other staples. Keep measuring cups and spoons nearby if there’s room, it streamlines prep when everything lives in one spot. Place this zone at a comfortable height for frequent access if baking is a regular activity.
Create a breakfast station with cereals, oatmeal, pancake mix, syrup, and coffee or tea supplies. Stack cereal boxes on their sides if shelf height allows: it saves space and keeps boxes from getting crushed. Some homeowners prefer grouping breakfast items near the kitchen table for quick morning routines.
Snack zones work well at kid-friendly heights. Use bins or baskets to corral individual snack bags, granola bars, and crackers so kids can grab what they need without tearing through the entire pantry. Label the bin if necessary to set boundaries on what’s fair game versus off-limits.
Canned goods, sauces, and condiments should occupy their own section, ideally organized by type, tomato products together, beans together, soups together. Rotate stock by moving older cans to the front and placing new purchases in the back. This FIFO (first in, first out) method reduces waste and keeps inventory fresh.
Store bulk items, paper goods, or overflow supplies on higher or lower shelves that are harder to reach. These zones hold backstock that isn’t needed daily but should still be accessible when it’s time to restock the main areas.
Maximize Vertical Space With Shelving and Risers
Most pantries waste vertical space by leaving several inches of dead air between the top of items and the shelf above. Adjustable shelving, stackable organizers, and risers reclaim that space and make every inch count.
Adjustable shelving is the single best upgrade for fixed pantries. Shelves set at standard 12- or 16-inch intervals don’t accommodate the variety of heights in a typical pantry. Adjustable standards and brackets let homeowners customize spacing to fit tall cereal boxes, short cans, or anything in between. Most systems use metal standards mounted to wall studs with brackets that clip in at any height. Measure the depth of the pantry carefully, shelves that are too shallow tip forward, and shelves that are too deep make items unreachable.
For renters or those avoiding permanent modifications, freestanding wire shelving units offer flexibility without drilling into walls. Look for units rated for at least 200 pounds per shelf if storing heavy items like canned goods or small appliances. Wire shelves provide airflow, which helps in humid climates, but small items may tip over, shelf liners add stability.
Shelf risers create a second tier on existing shelves, effectively doubling capacity. They’re ideal for canned goods, jars, and boxed items that don’t stack well on their own. Expandable risers adjust to fit different shelf widths, though fixed-size models are often sturdier. Some DIYers build custom risers from scrap wood or PVC pipe, cutting them to exact dimensions for a snug fit.
Hanging baskets or under-shelf baskets make use of the space beneath a shelf by clipping onto the edge and hanging downward. These work well for lightweight items like snack bags, napkins, or bread that would otherwise get squashed. Make sure the basket doesn’t block access to items on the shelf below, measure twice before installing.
Wall-mounted pegboards or grid systems add vertical storage for awkwardly shaped items like kitchen tools, measuring cups, or reusable bags. Mount them on an empty wall inside the pantry if there’s space. This approach keeps frequently used tools off the shelves and within arm’s reach, which is especially useful in compact pantries where counter space is limited.
These systems don’t require a carpenter, most are DIY-friendly with basic tools. Always locate studs when mounting heavy shelving or wall systems to prevent sagging or collapse. Toggle bolts or wall anchors can supplement, but they’re not substitutes for stud-mounted hardware when dealing with significant weight. If the pantry shares a wall with plumbing or electrical runs, drill carefully and avoid hitting infrastructure. When in doubt, consult resources on kitchen organization for installation guidance or hire a handyman for a few hours. The upfront effort pays off in long-term function and accessibility.