

A well-defined patio doesn’t just look finished, it performs better, too. Edging keeps pavers from shifting, gravel from migrating into the lawn, and grass from creeping into your outdoor living area. Whether you’re building a new patio or refreshing an existing one, the right border treatment can elevate the whole space without a complete overhaul. From classic brick soldier courses to living plant edges, the options span every budget and skill level. This guide walks through fifteen practical patio edging ideas, breaking down materials, installation considerations, and when to call in a pro.
Table of Contents
ToggleKey Takeaways
- Patio edging prevents pavers from shifting and grass from creeping into your outdoor space while reducing maintenance costs like hand-trimming and mower damage.
- Brick soldier courses and concrete paver edges require a compacted 2-inch gravel base and proper frost-line depth in cold climates to prevent settlement and frost heave.
- Budget-friendly patio edging options include plastic landscape edging ($0.50–$1.50 per linear foot), treated lumber, and steel panels—all delivering solid function without premium pricing.
- Modern alternatives like Cor-Ten steel and poured-in-place concrete borders suit contemporary designs and require minimal maintenance after installation.
- Living patio edges using groundcovers, ornamental grasses, or low shrubs add seasonal interest but demand ongoing irrigation and 2–3 annual trimmings for best results.
- Material selection should consider your patio’s existing construction (mortared vs. dry-laid), drainage needs, and design intent before installation begins.
Why Patio Edging Matters for Your Outdoor Design
Patio edging serves three core functions: structural support, aesthetic definition, and maintenance reduction. Without it, paver patios rely solely on compacted base material to resist lateral movement. Over time, freeze-thaw cycles and foot traffic push pavers outward, creating uneven surfaces and trip hazards.
From a design standpoint, edging creates a clean transition between materials, concrete to mulch, flagstone to turf, gravel to garden bed. It signals where one zone ends and another begins, which makes outdoor spaces feel intentional rather than haphazard.
Maintenance becomes easier, too. A proper edge barrier prevents mulch washout during heavy rain, keeps lawn mower wheels off paver joints, and reduces hand-trimming along borders. For most patios, edging pays for itself in saved labor within a couple seasons.
Before selecting a material, consider the patio’s existing construction. Mortared patios on concrete slabs require different edge solutions than dry-laid pavers on gravel base. If the patio abuts a structure, verify that the edging won’t interfere with drainage planes or create moisture traps against the foundation.
Classic Brick and Paver Edging Options
Soldier course brick (bricks set vertically in a trench) remains the most common patio edge in traditional landscapes. It works well with brick pavers or contrasting materials like bluestone. Dig a trench 6–8 inches deep, fill with 2 inches of compacted gravel, then set bricks on end with mortar or polymeric sand to lock them in place. This method requires a masonry saw or angle grinder to cut bricks for corners and curves.
Rowlock brick (bricks laid on edge, showing the narrow face) creates a lower profile and uses less material. It’s faster to install but offers less lateral restraint, so it’s best suited to patios with solid concrete bases rather than flexible sand-set installations.
Concrete paver edging gives you color and texture options beyond standard clay brick. Many manufacturers offer edging-specific units with thicker cross-sections or interlocking tabs. These work especially well when matching the patio field pavers for a seamless look.
For curved patios, consider segmental retaining wall blocks in a single course. Their wedge shape accommodates gentle arcs without cutting. Secure them with construction adhesive on the bottom course to prevent shifting.
All brick and paver edges benefit from a compacted gravel base. Skipping this step invites settlement and frost heave. In cold climates, extend the base below the frost line, typically 32–48 inches depending on your zone, or expect seasonal movement.
Natural Stone Borders for a Timeless Look
Fieldstone or cobblestone edging suits informal cottage gardens and rustic patios. Source stone locally to keep costs down: delivered pallets of fieldstone typically run $150–$300 per ton, covering roughly 80–100 linear feet depending on stone size. Lay stones in a shallow trench with crushed stone backfill, stacking 2–3 high for added presence.
Cut bluestone or limestone provides crisp geometry for formal designs. Standard 6×12-inch or 6×24-inch treads work well as edging: set them on edge in a concrete footing for permanence. This approach requires a wet masonry saw for clean cuts and takes longer than dry-stacked methods, but the result rivals professional hardscape installations.
River rock or beach pebbles (2–4 inches diameter) create a casual, permeable edge. Dig a trench, install landscape fabric to suppress weeds, then fill with stones. This option works best where the patio sits slightly above grade: otherwise, rocks migrate during rain. It’s low-cost but high-maintenance, expect to rake stones back into place seasonally.
Granite cobbles (reclaimed or new) offer durability for high-traffic edges. Set them in a mortar bed over compacted base for a European-style apron. Reclaimed cobbles carry character but may have uneven dimensions: budget extra time for sorting and fitting.
Stone edging pairs naturally with garden bed transitions, especially when the patio borders planted areas. The thermal mass of stone also helps moderate soil temperature swings in adjacent beds.
Budget-Friendly Patio Edging Solutions
Plastic landscape edging (polyethylene or polypropylene) is the workhorse of budget borders. Black 4-inch or 6-inch coils cost $0.50–$1.50 per linear foot and install quickly with 10-inch landscape spikes. It’s nearly invisible once backfilled and works well for gentle curves. For straight runs, rigid sections with interlocking stakes offer better alignment. Avoid thin 3-inch edging on pavers, it lacks the height to restrain base material.
Treated lumber (4×4 or 6×6 timbers) creates a bold, rustic edge at $8–$15 per 8-foot length. Use ground-contact rated or UC4B treated lumber to resist rot. Secure timbers with ½-inch rebar stakes driven through pre-drilled holes, or anchor them with landscape timber screws into treated 2×4 deadmen buried perpendicular to the edge. Expect 10–15 years of service before replacement in most climates.
Steel edging (recycled lawn edging or roofing panels) offers an industrial aesthetic for under $2 per linear foot. Cut 29-gauge galvanized panels into 4–6 inch strips with tin snips, then drive them into the ground along the patio perimeter. They rust over time, which some homeowners prefer for a weathered patina. For a cleaner look, use powder-coated aluminum landscape edging.
Poured concrete curbing is surprisingly affordable if you already own or rent a concrete mixer. Form a shallow trench with 2×4 lumber, pour standard 3,000 PSI mix, and trowel smooth. This works especially well for large patios where material costs favor bulk over per-unit pricing. Add fiber reinforcement to reduce cracking.
Decomposed granite or crushed gravel (¼-inch minus) creates a permeable transition zone rather than a hard edge. Dig a 4–6 inch trench, compact the material in 2-inch lifts, and wet it down. This method suits xeriscaped patios and drains better than solid edging, though it requires occasional top-dressing.
Modern Metal and Concrete Edging Ideas
Cor-Ten steel (weathering steel) delivers clean lines and controlled rust. Panels typically come in ⅛-inch or 3/16-inch thickness, cut to 4–8 inch heights. Weld corners for seamless joints or use L-brackets for a DIY approach. Cor-Ten develops a stable rust patina in 6–12 months, after which corrosion slows dramatically. It’s pricier, $8–$15 per linear foot installed, but requires zero maintenance and suits contemporary designs.
Aluminum landscape edging (commercial-grade, not lawn edging) offers a lighter-weight alternative. Powder-coated finishes resist fading, and the material won’t corrode in coastal or high-moisture environments. Install it similarly to steel, using stakes or a concrete footing. Many suppliers stock curved sections for radius work.
Poured-in-place concrete borders (sometimes called Belgian block edging) create a monolithic edge. This requires formwork and a small concrete pour, 80-pound bags of mix work for short runs, but rent a mixer for anything over 50 linear feet. Trowel a radius edge or stamp patterns before the concrete sets. Add rebar or wire mesh if the edge will support vehicle loads (driveway aprons, for example).
Concrete curb molds (rental or purchase) streamline the pour process. These adjustable forms clamp onto the patio edge, and you fill them with concrete, creating a uniform 4–6 inch curb. Some models include texture sleeves for decorative finishes. Plan for a ½-inch expansion joint every 10 feet to control cracking.
Metal and poured edges shine in modern outdoor spaces where minimalism and geometry dominate. They pair especially well with porcelain pavers, polished concrete, or large-format natural stone.
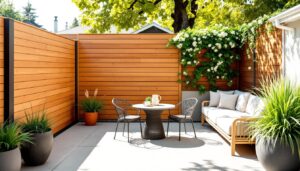
Living Edges: Plants and Greenery as Borders
Low-growing groundcovers (creeping thyme, sedum, or Irish moss) soften patio edges with living texture. Plant them in a 6–12 inch border zone between the patio and lawn, using landscape fabric beneath to suppress competing weeds. These plants tolerate foot traffic and fill in gaps pavers can’t. Water during establishment, then most groundcovers become drought-tolerant.
Ornamental grasses (dwarf fountain grass, blue fescue, or carex) add height and movement. Space plants 12–18 inches apart in a single row for a linear hedge effect. Grasses work well along curved patios where rigid materials would require excessive cutting. Trim them back once annually in early spring.
Boxwood or dwarf shrubs create a formal, clipped edge. Buxus ‘Green Gem’ or ‘Wintergreen’ stay under 2 feet tall with pruning and handle sun or part shade. Plant 15–18 inches on center for a continuous hedge. This option requires more maintenance, 2–3 shearings per year, but delivers a classic look that suits traditional Southern garden styles.
Perennial borders (lavender, catmint, or salvia) offer seasonal color and fragrance. Stagger heights and bloom times for three-season interest. Leave 18–24 inches between the patio edge and plantings to prevent overgrowth onto the hardscape. Mulch the planting bed with 2–3 inches of shredded bark to retain moisture and define the edge visually.
Living edges require irrigation in most climates, especially during establishment. If the patio lacks nearby hose access, plan for drip irrigation or a dedicated zone on your sprinkler system. Avoid planting directly against pavers in areas with poor drainage, standing water kills most groundcovers and encourages algae growth on the hardscape.
Conclusion
Choosing patio edging comes down to matching material performance with design intent and installation skill. Brick and stone offer proven durability, while metal and poured concrete fit modern aesthetics. Budget options like plastic edging and treated lumber deliver solid function without the premium price. Living edges bring seasonal interest but demand ongoing care. Whichever route you take, proper base prep and secure anchoring prevent the callbacks that turn a weekend project into a recurring headache.