

A well-designed grill setup transforms a patio from a concrete slab into a functional cooking and gathering zone. Whether planning a full outdoor kitchen or simply upgrading a standalone grill, the right layout improves workflow, safety, and enjoyment. This guide covers permanent built-ins, portable configurations, grill islands, covered structures, strategic placement, and finishing touches. Expect trade-specific measurements, material recommendations, and honest assessments of when to call a pro.
Table of Contents
ToggleKey Takeaways
- Patio grill ideas should prioritize permanent clearances of 10–15 feet from combustible materials and follow International Fire Code requirements to ensure safety.
- Built-in grill stations using steel studs (20-gauge minimum) on reinforced concrete slabs with stone veneer cladding create a cohesive outdoor kitchen while maximizing counter prep space.
- Portable grill setups on rolling carts offer flexible patio configurations for renters and seasonal cooks, paired with modular prep tables at 36-inch counter height for ergonomic workflow.
- Grill islands require a minimum 8-foot linear run with 48–60 inches of rear clearance for safe cooking and traffic flow, accommodating drop-in components like side burners and sinks.
- Covered structures like pavilions must maintain 7-foot minimum clearance above grates with open sides and proper ventilation to prevent fire hazards and smoke buildup.
- Strategic placement upwind of dining areas combined with LED task lighting (300–500 lumens) and bar-height seating at 42 inches transforms a grill area into a functional gathering zone.
Built-In Grill Stations for a Seamless Outdoor Kitchen
Built-in grill stations integrate the cooking surface into a permanent countertop structure, typically framed with steel studs or concrete block and clad in stone veneer, stucco, or tile. This approach creates a cohesive look and maximizes counter prep space.
Frame and Base Construction
Steel studs (20-gauge minimum) resist rust better than wood framing in outdoor environments. Space studs at 16 inches on center and anchor the base to a 4-inch reinforced concrete slab poured over compacted gravel. If the patio lacks a suitable slab, this becomes a structural addition requiring a permit in most jurisdictions.
For block construction, use 8×8×16-inch concrete masonry units (CMUs) and fill cores with rebar and grout for lateral strength. Cap the top course with a bond beam before installing the countertop.
Countertop and Cladding
Porcelain tile, granite, and poured concrete are common countertop materials. Granite slabs (1¼-inch thick) handle heat and weather well but require professional fabrication and installation. Porcelain tile over cement backer board is a cost-effective DIY option: use large-format tiles (12×24 inches or bigger) to minimize grout lines.
Stone veneer or stacked stone cladding attaches to the frame with mortar or mechanical clips. Many homeowners draw inspiration from patio design trends that blend natural materials with modern grilling technology. Leave a ventilated air gap behind combustible cladding per the grill manufacturer’s clearance specs, typically 6 inches minimum from the firebox.
Gas and Electrical Runs
Built-ins often require a natural gas line (black iron or CSST flexible gas pipe) and a 120V GFCI-protected circuit for electronic igniters, rotisserie motors, and task lighting. Gas work and electrical pulls typically need permits and inspections. Hire a licensed plumber for gas: mistakes can be catastrophic. Electrical may be DIY-friendly if you’re comfortable pulling wire through conduit and making code-compliant connections, but verify local rules.
Portable Grill Setups for Flexible Patio Layouts
Portable setups suit renters, seasonal cooks, and anyone who rearranges outdoor furniture frequently. Modern cart-style gas and charcoal grills roll on locking casters and offer side tables, tool hooks, and propane storage.
Choosing the Right Grill
Look for grills with welded steel frames and cast-iron or stainless grates. Stainless models (304 grade minimum) resist coastal or humid climates better than painted steel. For charcoal, kettle grills with ash catchers and adjustable vents offer temperature control: offset smokers work if you have room and patience.
Gas grills need either a 20-pound propane cylinder (standard exchange size) or a quick-disconnect hose to a larger 100-pound tank or natural gas stub if you later go permanent. Propane delivers roughly 91,500 BTUs per gallon: a typical three-burner grill rated at 36,000 BTU total runs about 2.5 hours per pound of fuel at full blast.
Creating a Modular Station
Pair a rolling grill with a stainless-steel prep cart or a DIY table built from pressure-treated 2×4 framing and a marine-grade polymer or tile top. Keep the table height at 36 inches to match standard kitchen counter ergonomics. Add hooks for tongs and a magnetic strip for knives.
For stability on pavers or uneven decking, use adjustable furniture levelers on table legs and lock all grill casters before cooking.
Storage and Weatherproofing
Store propane cylinders upright in a ventilated outdoor cabinet or open cart: never in an enclosed garage or basement. Cover the grill with a UV-resistant polyester or vinyl cover rated for outdoor use. Cheap covers degrade in one season: look for double-stitched seams and vents to prevent mildew.
Creating a Grill Island with Counter Space and Storage
A grill island combines the cooking surface, prep counters, storage cabinets, and often a side burner or refrigerator into a single freestanding or L-shaped structure. This is a step up from a simple built-in and delivers restaurant-level workflow.
Sizing and Layout
Plan a minimum 8-foot linear run for a functional island: 30 inches for the grill cutout, 24 inches of counter on each side, and room for a door or drawer stack. If adding a side burner or sink, extend to 10–12 feet. An L-shaped island opens up even more counter space and creates a natural serving bar.
Maintain at least 48 inches of clearance behind the cook for traffic flow and safety. If the island backs onto a dining area, budget 60 inches so diners don’t get smoked out.
Cabinet and Door Options
Outdoor-rated cabinets come in stainless steel, polymer (HDPE), or marine-grade plywood with waterproof finish. Stainless doors and drawer boxes handle wet climates but show fingerprints and scratches. Polymer cabinets won’t rust or warp and cost less, though they can look utilitarian.
For DIY builds, frame door openings with the same steel studs or CMUs used in the island structure, then install prefab doors or build face-frame doors from cedar or treated lumber with stainless hinges and latches. Seal all wood with exterior-grade polyurethane or spar varnish.
Drop-In Components
Grills, side burners, and sinks mount as drop-ins with flanges that rest on the countertop opening. Measure the cutout dimensions precisely per the manufacturer’s template. Use a jigsaw with a carbide-grit blade for cutting porcelain or stone tile: a circular saw or grinder for concrete board.
Side burners typically need a separate gas shutoff valve. A sink requires a 3/4-inch water supply line and a 1½-inch drain that either connects to the home’s plumbing or drains to a French drain if it’s only for rinsing vegetables.
Covered Grill Areas for Year-Round Outdoor Cooking
A pergola, pavilion, or extended roof overhang shelters the grill from rain and sun, extending the cooking season and protecting countertops from weather damage. This is especially valuable in regions with frequent afternoon storms or intense UV.
Pergola vs. Pavilion
A pergola has open rafters (typically 2×6 or 2×8 lumber on edge, spaced 12–24 inches apart) that provide partial shade and support for climbing plants or retractable canopies. It won’t keep you dry in a downpour.
A pavilion features a solid roof (asphalt shingles, metal panels, or polycarbonate sheets) on a post-and-beam frame. Posts are usually 6×6 treated lumber or steel columns anchored to concrete footings below frost depth. A pavilion requires a building permit in most areas since it’s a permanent structure with a roof.
Clearance and Ventilation
Never install a grill under a fully enclosed roof or low ceiling without commercial-grade ventilation. Even a pavilion needs minimum 7-foot clearance above the grill grates and open sides for airflow. Some jurisdictions treat covered cooking areas as enclosed spaces and require a Type I hood with fire suppression, especially if the structure has three or more walls.
For a DIY pergola, space rafters to create natural convection. Orient the structure so prevailing winds blow smoke away from seating areas.
Roofing Materials
Asphalt shingles match the house but require roof sheathing (½-inch OSB or plywood) and felt underlayment. Metal roofing (corrugated steel or standing seam) installs faster, sheds water efficiently, and resists embers from the grill. Polycarbonate panels let light through but can yellow over time and may not meet fire-resistance codes near an open flame.
Flash the roof connection to the house with step flashing and ice-and-water barrier if the pavilion ties into an exterior wall. Improper flashing is a common leak point.
Grill Placement Tips for Safety and Convenience
Placement affects safety, workflow, smoke management, and compliance with fire codes. Mistakes here can mean a ruined dinner, or a ruined deck.
Clearances from Structures
Most grill manufacturers and the International Fire Code (IFC) require 10 feet minimum from combustible siding, overhangs, and fences. Check your manual: some high-BTU models specify 15 feet. Vinyl siding melts: wood siding and composite decking can ignite from radiant heat and grease fires.
If placing a grill on a wood deck, install a grill mat or pad (fiberglass-reinforced silicone or interlocking deck tiles rated for 500°F+) to protect the decking from grease and ember damage. Better yet, build a non-combustible grilling platform from pavers, concrete, or flagstone.
Proximity to Kitchen and Utilities
Position the grill within 20–30 feet of the indoor kitchen to minimize trips for ingredients and tools. If installing a sink or refrigerator in the grill island, closer to the house means shorter plumbing and electrical runs, saving on materials and labor.
Wind and Smoke Patterns
Observe prevailing wind direction during typical cooking hours. Grilling upwind of the dining table or house windows will smoke out guests. If possible, place the grill where breezes carry smoke toward an open yard or alley.
Landscaping can help: a low hedge or decorative screen (non-combustible materials or kept at safe distance) redirects smoke without blocking ventilation. Design inspiration often comes from outdoor entertaining layouts that balance aesthetics with practical airflow.
Accessibility and Traffic Flow
Leave 48 inches of clearance in front of the grill and on the side where you’ll stand. Don’t position the grill in a high-traffic path between the door and seating: someone will bump the cook mid-flip. For wheelchair accessibility, provide a clear 5-foot turning radius and lower one section of counter to 34 inches.
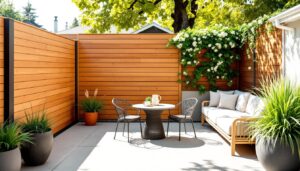
Enhancing Your Grill Area with Lighting and Seating
Functional lighting and comfortable seating extend usable hours and elevate the cooking experience from chore to event.
Task and Ambient Lighting
Install LED task lights above or beside the grill, rated for wet or damp locations (UL listing). Mount lights on a gooseneck arm or track so they illuminate the grates without creating harsh shadows. Aim for 300–500 lumens per fixture.
For ambient lighting, use low-voltage path lights (12V systems are DIY-friendly and code-compliant without permits in most areas) along walkways and steps. String lights (Edison bulbs or LEDs) suspended on a pergola or between posts create atmosphere: use commercial-grade outdoor strands with weatherproof sockets.
All wiring should run through UL-listed conduit (PVC Schedule 40 or rigid metal) buried at code depth (typically 18 inches for low-voltage, 24 inches for line voltage). Use GFCI protection on all 120V circuits: outdoor receptacles must be GFCI and in weather-resistant covers.
Seating and Dining Zones
Position a dining table 6–10 feet from the grill, close enough for serving but far enough to avoid smoke and heat. Standard outdoor dining tables are 28–30 inches high: pair them with chairs or benches.
For casual seating, add a bar-height counter (42 inches) on the non-cooking side of the island with stools. This creates a natural gathering spot where guests can chat with the cook without crowding the work zone. Many outdoor kitchen designs incorporate tiered counters for this reason.
Use weather-resistant materials: aluminum, teak, or all-weather wicker for furniture. Cushions should have solution-dyed acrylic fabric (Sunbrella or equivalent) that resists fading and mildew. Store cushions in a deck box when not in use to extend their life.
Conclusion
A thoughtfully designed grill area balances function, safety, and comfort. Whether building a full island, upgrading a portable setup, or adding a pergola, attention to clearances, materials, and workflow pays off in better meals and more time outdoors. Tackle what fits your skill level, and don’t hesitate to bring in licensed pros for gas, electrical, or structural work.