

The vanity anchors a master bathroom. It sets the tone for the space, handles daily use, and often accounts for a third of the room’s visual weight. Whether you’re planning a full remodel or just replacing a builder-grade cabinet, the right vanity choice balances style, function, and the realities of plumbing rough-ins. This guide covers vanity ideas spanning modern floating units to farmhouse double-sinks, plus storage hacks and budget makeovers. Each approach addresses real-world challenges, narrow floor plans, shared morning routines, and the need for counterspace that doesn’t collect clutter.
Table of Contents
ToggleKey Takeaways
- Master bathroom vanity ideas range from modern floating units to farmhouse double-sinks, each addressing specific challenges like tight floor plans and shared morning routines.
- Floating vanities require secure mounting to wall studs with proper plumbing rough-in coordination, making them ideal for minimalist designs and smaller bathrooms.
- Double-sink vanities eliminate morning bottlenecks and need proper spacing (30–36 inches basin-to-basin) with engineered quartz countertops for durability without sealing.
- Farmhouse vanity styles using reclaimed wood or repurposed dressers require reinforced support and moisture-resistant finishes to withstand bathroom humidity.
- Smart storage solutions like drawer dividers, pull-out shelves, and hidden compartments prevent counter clutter and maximize functionality in master bathrooms.
- Budget-friendly vanity makeovers using paint, hardware swaps, and epoxy coatings deliver fresh results for $75–$200, a fraction of the cost of full replacement.
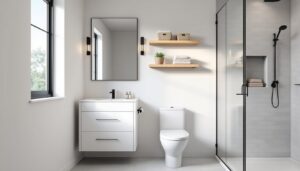
Modern Floating Vanities for a Sleek, Spacious Look
Wall-mounted vanities free up floor space and simplify cleaning. They’re ideal for smaller master baths or minimalist designs where visual weight matters. The cabinet mounts to wall studs using a heavy-duty ledger board or steel rail system rated for the unit’s weight plus the countertop.
Installation notes:
- Locate studs with a finder: floating vanities need at least two 16-inch on-center studs for secure attachment.
- Run plumbing before mounting. Drain and supply lines exit through the wall, not the floor, so coordinate rough-in height (typically 18–21 inches above finished floor for a 30-inch-tall vanity).
- Use a laser level to mark the ledger position. Even a half-degree tilt becomes obvious once the countertop is on.
Material choices:
Plywood-core cabinets hold fasteners better than particleboard. Look for ¾-inch veneer-core plywood if the manufacturer offers it. Drawer boxes should be dovetailed or doweled, not stapled.
Floating vanities pair well with vessel sinks or integrated countertops. Skip undermount sinks here, they add weight and complicate the cantilevered load. If the design includes drawers, confirm they clear the P-trap: shallow drawers work better than deep ones in wall-mount configurations.
Double Sink Vanities for Shared Bathrooms
Two sinks eliminate morning bottlenecks. Standard double-sink vanities run 60 to 72 inches wide: anything shorter cramps elbow room. Each sink needs a minimum 30-inch basin-to-basin centerline spacing per most plumbing codes, though 36 inches feels less tight.
Plumbing considerations:
- Each sink requires its own P-trap and drain line. They can share a vent if the distance to the stack meets IRC requirements (typically within 6 feet of the vent).
- Supply lines (hot and cold) double, so budget for extra shutoff valves and flex connectors.
- If the existing rough-in only has one drain, you’ll need to run a second or use a center-drain vanity with basins offset to share one drain, less common but available.
Counter material:
Engineered quartz handles daily use without sealing. It resists staining better than marble and doesn’t etch from toothpaste or hairspray. Standard slab thickness is 3 cm: edges can be finished square, beveled, or with an ogee profile depending on style.
Double-sink layouts often sacrifice storage. Look for units with full-extension drawer glides and interior organizers. Homeowners planning custom storage solutions often integrate vertical dividers for hair tools and pull-out trays for toiletries.
Rustic and Farmhouse Vanity Styles
Farmhouse vanities lean on reclaimed wood, apron-front sinks, and visible hardware. Many DIYers repurpose old dressers or build custom units from dimensional lumber (actual 1½ × 3½-inch boards sold as 2×4s, etc.).
DIY build tips:
- Use pine, poplar, or oak for the frame. Seal all surfaces with polyurethane or a water-based topcoat rated for bath humidity.
- If incorporating a vessel or undermount sink, reinforce the countertop support with 2×4 crossbraces every 16 inches. Plywood alone sags under a stone vessel over time.
- Apron sinks (farmhouse style) require a cutout in the cabinet face. Measure the sink’s exterior dimensions and subtract ⅛ inch for a snug fit, then finish raw edges with edge banding or trim.
Finish options:
Distressed paint or stain highlights wood grain. For a weathered look, apply a base coat of gray or white latex, sand through to bare wood in high-wear spots, then seal. Skip the distressing if the vanity will actually see hard use, it becomes real wear, not character.
Many homeowners browsing farmhouse design galleries pair these vanities with oil-rubbed bronze faucets and shiplap or beadboard backsplashes. Keep the wall treatment at least 4 inches above the counter to avoid water damage at the seam.
Smart Storage Solutions for Master Bathroom Vanities
Clutter collects on counters when storage design ignores actual use. Effective vanity storage separates daily items (toothbrush, razor) from occasional supplies (extra soap, first aid) and keeps cords out of sight.
Built-in organizers:
- Drawer dividers: Adjustable pegs or foam inserts keep makeup, brushes, and tools sorted. Measure drawer interior dimensions (not exterior) before buying aftermarket kits.
- Pull-out shelves: Install on undermount drawer slides rated for 75–100 pounds. These work well under sinks where fixed shelves waste vertical space around the P-trap.
- Electrical outlets inside drawers: Requires a licensed electrician. Outlets let you charge electric toothbrushes or shavers without visible cords. Use GFCI-protected outlets per NEC 210.8(A) for bathroom circuits.
Vertical space:
Tall cabinets (often called linen towers) flank the vanity in larger baths. Standard depth is 12 to 18 inches: deeper units intrude on walkways. Mount them to studs with 3-inch cabinet screws, not drywall anchors.
Hidden compartments:
False drawer fronts below sinks can hinge open to reveal storage trays for sponges or cleaning supplies. This trick reclaims otherwise dead space and keeps the sink base uncluttered.
Luxury Vanity Upgrades: Marble, Quartz, and High-End Finishes
High-end vanities distinguish themselves through material quality and joinery, not just price tags. Natural stone, solid hardwood, and custom fabrication elevate a master bath, but each requires specific care or installation.
Countertop materials:
- Marble: Calacatta and Carrara offer classic veining. Seal with a penetrating sealer every 6–12 months. Expect etching from acidic products: some homeowners embrace the patina.
- Quartz (engineered stone): Non-porous, no sealing needed. Brands like Caesarstone and Silestone offer uniform patterns or marble-look designs. Slabs typically measure 120 × 55 inches and require professional fabrication.
- Solid surface (Corian, etc.): Seams can be nearly invisible. Scratches sand out, but heat tolerance is lower than stone, don’t set hot styling tools directly on it.
Cabinet construction:
Dovetail joinery in drawer boxes (not stapled or biscuit-joined) signals quality. Soft-close hinges and full-extension glides are standard in mid-to-high-end units. Inspect the back panel, ½-inch plywood is sturdier than ¼-inch MDF.
Integrated sinks:
A countertop and sink milled from one slab eliminates seams and simplifies cleaning. Custom fabrication typically adds 15–25% to material cost. The variety of high-end fixtures available includes trough-style sinks and waterfall-edge counters, though these require precise plumbing alignment.
Lighting integration:
Backlit mirrors or under-cabinet LED strips need dedicated circuits. Use low-voltage LED tape (12V or 24V) with a transformer hidden in the vanity. Wire it to a dimmer switch for adjustable task lighting.
Budget-Friendly Vanity Makeover Ideas
A fresh vanity doesn’t require a gut renovation. Targeted upgrades refresh the space for a fraction of replacement cost.
Paint and hardware:
- Remove doors and drawer fronts. Label hinge locations with painter’s tape.
- Clean all surfaces with TSP (trisodium phosphate) or a degreaser. Rinse and dry completely.
- Sand with 120-grit paper to scuff the finish. Wipe with a tack cloth.
- Prime with a bonding primer (e.g., Zinsser B-I-N or Kilz Adhesion). This step is non-negotiable for laminate or previously finished wood.
- Apply two coats of semi-gloss or satin latex paint. Let each coat dry per manufacturer specs (usually 4–6 hours).
- Swap hardware. Measure existing hole spacing (most pulls are 3- or 3¾-inch center-to-center). If switching from knobs to pulls, fill old holes with wood filler, sand, and touch up paint.
Countertop overlays:
Peel-and-stick granite film or epoxy coatings mimic stone. Epoxy kits (popular brands: Stone Coat, Countertop Transformations) require mixing resin and hardener, then rolling on multiple coats. Work in a well-ventilated space and wear nitrile gloves and a respirator rated for organic vapors. Cure time runs 48–72 hours.
Open shelving conversion:
Remove lower cabinet doors to create open storage. Paint or stain the interior, add L-brackets for small shelves if needed, and style with baskets or folded towels. This works best if the plumbing under the sink is presentable, consider a pedestal sink skirt if it’s not.
Cost estimates:
Paint, primer, and hardware typically run $75–$150. Epoxy countertop kits cost $100–$200 depending on square footage. Compare that to $800–$2,500 for a new vanity and stone top.
Conclusion
Choosing a master bathroom vanity involves measuring the space, understanding plumbing limitations, and balancing style with storage needs. Floating units suit modern aesthetics and tight quarters. Double sinks serve shared routines. Farmhouse builds allow customization. Smart storage keeps counters clear, and high-end materials add lasting value. Budget makeovers deliver impact without demolition. Whichever direction fits the project, proper prep and realistic material specs make the difference between a successful install and a redo.